I haven't been updating very often and the garage has recluttered with all the garagey things that don't really belong in the house but can't stay outside either. I had planned to declutter again, maybe even have a small garage sale, but that's a lot of work.
Last year I worked on my DragonCon costume almost every weekend throughout the summer. It was great and I learned a lot about sewing. On the other hand, I didn't get anything else done that summer. This spring my time has been taken up mostly with writing. I finally finished my current book, a full-length steampunk fantasy with the same characters (Lizzy and Jo) I've been writing short stories about for a year. Now I've only got two months until DragonCon, I'm kind of broke so I can't indulge myself with buying a lot of fabric, and I'm still behind on my writing.
So I'm probably not going to dress up at DragonCon this year. I will try to take a few weekends during the rest of the summer to do some sort of steampunky project to post about, though. I need a pair of goggles that aren't covered in feathers, for instance.
Showing posts with label DragonCon. Show all posts
Showing posts with label DragonCon. Show all posts
Sunday, June 29, 2014
Sunday, May 11, 2014
Another petticoat
Aw man, how did it get to be May already? I've only got four months until DragonCon! I'm not ready!
This year I want to dress as a lady botanist. I decided that last fall after I got a tattoo of vines on my right leg. This week I'll be going to get a similar tattoo on my left leg. But I haven't done anything for the outfit because hey, lots of time left, right? Wrong! Hardly any time left and I don't know what to do about a vasculum. A botanist needs a vasculum but they're just not available since modern botanists, who have no souls, just carry plastic bags.
Anyway, my feather-trimmed petticoat from last year won't do so I decided to make a new one. A girl can never have too many petticoats. Unfortunately I soon grew to loathe the cloth; fortunately, it was cheap and won't show. I decided not to trim it with anything, just hemmed the bottom tier.

Above: the first of many endlessly long seams.
As always, putting the basting thread in for ruffling is a tedious process since I have to do it by hand. Then it takes more tedious time to do the actual ruffling and get everything pinned and ready to sew. The process is made more difficult with a cat who loves it when I get down on the floor, because he thinks I want to play with him.

The process is also made more difficult these days since I've got a drum kit in my living room. I can't quite bring myself to move it out to the garage even though that would make more sense. I like knowing it's safe inside. It's a horrible cheap kit but I love it dearly.

Incidentally, if you're not clear on how ruffling works, this picture might help. See the thread passing through the cloth, the one I've got my finger under? That's the basting thread. You pull it (steadily but firmly) and it wrinkles up the cloth. When you've got the wrinkles distributed evenly all down the thread, you pin them in place and sew a seam along the basting thread, then pull the basting thread out completely. It's actually pretty easy although it sounds complicated.

I use a three-tier pattern, with the bottom two tiers ruffled and the top tier just plain. I didn't measure the top tier around my waist, just figured I'd put in tucks or something later once I lose the weight I put on over the winter. (You must imagine me saying that in an immensely dignified voice.) It's much too big now since I only tapered the top piece a few inches.

Above: the pieces sewn together and awaiting the seam up the side.
I folded the top down half an inch, then folded it over again an inch and sewed it to make a plain waistband. Then I sewed up the side seam, starting at the bottom hem and continuing up to about halfway up the top tier. I stopped there and folded the edges above it back and sewed them, to make a horrible ugly ineffective and sloppy placket. I had thought I'd sew a button on later and that would be that, but I think I'll have to do more work to the waistband later in the summer.

Above: worst placket ever
Even so, the petticoat will work as is even if I have to safety pin it all around my waist when the time comes. The ruffles are nice and ruffly and will make my skirt stand out properly. I will probably wear the same skirt as last year, since it's lovely and fits and goes with my corset. So now I just have to figure out what the hell to do about a top. And I also need to find a vasculum.
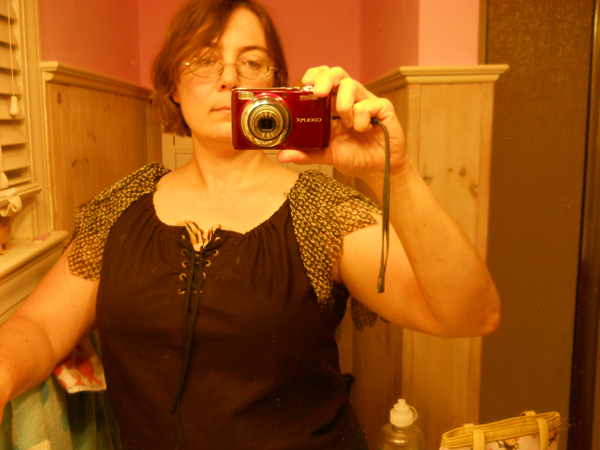
Here's the petticoat worn, with it hitched up a bit so you can see part of my awesome tattoo:

This year I want to dress as a lady botanist. I decided that last fall after I got a tattoo of vines on my right leg. This week I'll be going to get a similar tattoo on my left leg. But I haven't done anything for the outfit because hey, lots of time left, right? Wrong! Hardly any time left and I don't know what to do about a vasculum. A botanist needs a vasculum but they're just not available since modern botanists, who have no souls, just carry plastic bags.
Anyway, my feather-trimmed petticoat from last year won't do so I decided to make a new one. A girl can never have too many petticoats. Unfortunately I soon grew to loathe the cloth; fortunately, it was cheap and won't show. I decided not to trim it with anything, just hemmed the bottom tier.
Above: the first of many endlessly long seams.
As always, putting the basting thread in for ruffling is a tedious process since I have to do it by hand. Then it takes more tedious time to do the actual ruffling and get everything pinned and ready to sew. The process is made more difficult with a cat who loves it when I get down on the floor, because he thinks I want to play with him.
The process is also made more difficult these days since I've got a drum kit in my living room. I can't quite bring myself to move it out to the garage even though that would make more sense. I like knowing it's safe inside. It's a horrible cheap kit but I love it dearly.
Incidentally, if you're not clear on how ruffling works, this picture might help. See the thread passing through the cloth, the one I've got my finger under? That's the basting thread. You pull it (steadily but firmly) and it wrinkles up the cloth. When you've got the wrinkles distributed evenly all down the thread, you pin them in place and sew a seam along the basting thread, then pull the basting thread out completely. It's actually pretty easy although it sounds complicated.
I use a three-tier pattern, with the bottom two tiers ruffled and the top tier just plain. I didn't measure the top tier around my waist, just figured I'd put in tucks or something later once I lose the weight I put on over the winter. (You must imagine me saying that in an immensely dignified voice.) It's much too big now since I only tapered the top piece a few inches.
Above: the pieces sewn together and awaiting the seam up the side.
I folded the top down half an inch, then folded it over again an inch and sewed it to make a plain waistband. Then I sewed up the side seam, starting at the bottom hem and continuing up to about halfway up the top tier. I stopped there and folded the edges above it back and sewed them, to make a horrible ugly ineffective and sloppy placket. I had thought I'd sew a button on later and that would be that, but I think I'll have to do more work to the waistband later in the summer.
Above: worst placket ever
Even so, the petticoat will work as is even if I have to safety pin it all around my waist when the time comes. The ruffles are nice and ruffly and will make my skirt stand out properly. I will probably wear the same skirt as last year, since it's lovely and fits and goes with my corset. So now I just have to figure out what the hell to do about a top. And I also need to find a vasculum.
Here's the petticoat worn, with it hitched up a bit so you can see part of my awesome tattoo:
Saturday, September 7, 2013
The Nightgown, finished
I put pictures and commentary from my excellent DragonCon experience last week up on my regular blog. I inexplicably didn't take many pictures of random people dressed up, but there are lots and lots of blogs/sites out there with lots of pictures.
As I say, I had a fantastic time. I wore my modest costume on Saturday and got some compliments, especially on my awesome hat, attended a bunch of panels, saw friends, met new people, and saw some of my absolute favorite musicians perform. But now I'm back and I'm still not recovered from an intense, sleep-deprived weekend.
So this week I haven't done anything except laundry and housework. Yardwork's next, when I can muster my enthusiasm. The blog will probably be quiet for the next few weeks, if not longer, while I work on other stuff. But one thing I did find time for was finishing the nightgown that started this whole steampunk garage project.

My camera has vanished, but here's a small picture I took with my phone. The nightgown is simple and not terribly attractive when worn--I used this tutorial. I learned a lot about sewing from making this thing, though, including how to sew ruffles. I am something of an expert ruffler now, but it all started here. I had fun doing the embroidery although it's not as elaborate as I'd intended.
So what's up for the steampunk garage in the near future? A lot of clutter has crept back into the garage and I need to tidy it, for one thing. I also want to finish turning my antique brass blowtorch into a steampunk "weapon." And I want to make another steampunk outfit so I've got something warm and non-feathery to wear to AnachroCon in February (and probably ChattaCon in January).
So keep checking back, and hopefully soon I'll be back to work in the garage. First, though, I need to finish this steampunk YA I've been writing.
As I say, I had a fantastic time. I wore my modest costume on Saturday and got some compliments, especially on my awesome hat, attended a bunch of panels, saw friends, met new people, and saw some of my absolute favorite musicians perform. But now I'm back and I'm still not recovered from an intense, sleep-deprived weekend.
So this week I haven't done anything except laundry and housework. Yardwork's next, when I can muster my enthusiasm. The blog will probably be quiet for the next few weeks, if not longer, while I work on other stuff. But one thing I did find time for was finishing the nightgown that started this whole steampunk garage project.
My camera has vanished, but here's a small picture I took with my phone. The nightgown is simple and not terribly attractive when worn--I used this tutorial. I learned a lot about sewing from making this thing, though, including how to sew ruffles. I am something of an expert ruffler now, but it all started here. I had fun doing the embroidery although it's not as elaborate as I'd intended.
So what's up for the steampunk garage in the near future? A lot of clutter has crept back into the garage and I need to tidy it, for one thing. I also want to finish turning my antique brass blowtorch into a steampunk "weapon." And I want to make another steampunk outfit so I've got something warm and non-feathery to wear to AnachroCon in February (and probably ChattaCon in January).
So keep checking back, and hopefully soon I'll be back to work in the garage. First, though, I need to finish this steampunk YA I've been writing.
Thursday, August 29, 2013
Last sleep before DragonCon!
Tomorrow morning I plan to roll out of bed at whatever time I wake naturally (or whatever time the cat wakes me, actually) and head out to DragonCon. My goal is to get there and get my badge picked up by around lunchtime or a little later, depending on traffic. Then I can hit a few panels and look around, hopefully meet up with friends, before heading to my hotel in Kennesaw to check in, grab some food, and return to the con.
Saturday will be my exhausting day, because I want to watch the parade at 10am (for which it's best to get there at 9am or thereabouts) and see Professor Elemental and Abney Park perform at midnight. Sunday will be almost as exhausting, because there's a 10am panel I don't want to miss ("The Science of Airships") and I also want to see Voltaire perform at midnight--and of course, both days I've got tons of stuff I want to do in between.
I took today off work to get all the last-minute stuff done. My attempt at making my own bag was a failure, but I found a bag I really like at Goodwill for a few bucks and added some decoration. The owl thing is my $5 pocketwatch! I finally have a place to put it.

And I crocheted this adorable pouch for Owlet from this tutorial. I didn't have time to handspin yarn of the right weight, so I bought a nice silk/bamboo blend and used it instead. Ordinarily I don't sew random gears on things, but hell, it's a pouch for a toy owl, sewing gears on it isn't going to make it any sillier than it already is. The button is for Walter Sickert and the Army of Broken Toys, a great band but also the button has tiny owls as part of the design. So, you know.

If you're going to be at DragonCon and you'd like to meet up, just email me at kcshaw123 [at] gmail [dotcom]. If you've got the DragonCon app, email me a friend code if you like! I'd love to have someone to hang out with, especially at the live performances.
I will, of course, take plenty of pictures.I'll post them when I get home on Monday!
Sunday, August 25, 2013
Yes! Pictures of my DragonCon costume!
It's not complete--I still have the bag to finish, and a few little additions--but the bulk of it is done and I got real pictures taken today.

My aunt Janice took the pictures, and she said I definitely need to wear my boots instead of the heels I had planned. The boots are more comfortable anyway. Here's a closeup of them along with my lacy socks, with me pulling my skirt up a bit to show off my petticoat:

I also need to take both the petticoat and the skirt in a bit. They're just too big. When I suck my gut in (ahem) to fasten my corset, the skirt and petticoat sag. Once the corset's fastened it's hard to adjust my clothes. Also, for anyone who's never worn a corset before: it's the last thing you should put on, including shoes. Especially shoes.

That hat is so awesome.

And here's me trying not to laugh, because of course Janice kept cracking me up. She got some action shots of me goofing around pretending to catch owls, but they were A) blurry and B) made me look insane. You'll just have to find me at DragonCon to see me acting insane. I'm not used to seeing myself doing anything but standing in front of the mirror, of course, so maybe I always look insane.

Saturday, August 24, 2013
A net to catch an imaginary owl
This took entirely too long to make considering how simple it is.
First, start with a dowel and the center piece of a wooden embroidery hoop. Screw them together and saw the dowel off at the desired length. (I wasn't able to screw the screw in all the way since the flimsy hoop started to crack, but it doesn't really show.)

Then spraypaint the whole thing. I painted it what was supposed to be brown but looked really gray, so I spritzed over it a bit with some copper spraypaint. Let it dry overnight.
Cut a thin strip of leather (or fake leather) of really any length. You can stop wrapping when you think it looks good or add more if you want. Lay a line of glue (Gem-Tac! My favorite! It smells just like Elmer's but it holds better) along the back side of the leather. Then press a few inches of the leather (glue side down, of course) along the dowel and over the end, then twist it around and wrap the strip around and around the dowel, covering the strip you laid down initially, until you run out of strip or decide it looks good and stop wrapping and cut off the rest. This took almost no time at all--seriously, I think it took longer for me to figure out how to explain what I did than it took to actually do it.

Then get a lot of string and...make a net.
The net took me hours. But look! I caught an owl.

(If you find the owl as adorable as I do, you can buy your very own on etsy at Green Owl Curiosities, and the proceeds go to an owl/raptor rehabilitation society. Yes, this little guy is going to DragonCon with me. I need to put my name and number on him somewhere in case he escapes.)
Friday, August 23, 2013
The Other Half of the Shirt
The shirt is finally finished. It took much longer than I expected. Here it is finished, first of all--and no, I'm not wearing my corset because I just ate a burger and fries and two cookies and I'm not sure I could fasten it at the moment. Also I'm wearing my glasses. On the plus side, I just got my hair cut today.

My first step was to hem the, the--what the hell is that called, anyway? I just searched Wikipedia with no luck. Let's call it the placket in the middle of the neckline, even though technically it's not a placket. Anyway, my first step was to hem the placket and add grommets. Now that I know how to add grommets, I can see I'll be adding them to everything. I laced the placket up with more of the cord cut from the extra laces from my corset (although if I keep eating like I did today, I'm going to have to loosen the cords again).
I tried it on to see what it looked like, and oops. No matter how tightly I pulled the laces, I was showing an awful lot of cleavage. I decided to make a modesty panel.
I was messing around with various fabrics to see what would look best when I noticed a yard of feather tape I'd bought off etsy on a whim, months ago, but never found a use for. The feathers are short and small compared to the feather tape I used to trim my petticoat. On impulse I held them up to the placket, and loved the effect.
So I sewed a piece of feather tape on either side of the placket, feathers pointing in. They hide what I need to hide and look good too. I worried they'd tickle, but they don't.
After that I had to do the sleeves. I did a terrible job. I ended up adding three layers of fabric to each sleeve and I still don't like the effect, but I'm tired of fooling with it so it'll have to do. I trimmed each layer in feather-like scallops.
Incidentally, I stabbed my thumb badly last night while working on the sleeves. Then I stepped on a sewing needle and drove it right up into my bare foot. If it had been the same needle both times, that might have been understandable. Instead, I got up to deal with my bleeding thumb, came back and sat down at the computer to tweet about it (tweeting about an event is the most important part of an event, right?), then stood up to go back to sewing, at which point I accidentally knocked a loose needle off the computer desk, it fell into the pile of the carpet point-up, and I stepped on it. This is why I didn't finish the shirt until tonight.
If all goes well, I should have photos up of me in my full DragonCon outfit, probably on Sunday. And these will be real pictures, not selfies taken in the dirty mirror in the garage. It will be epic.
Sunday, August 18, 2013
Half a shirt
I've been having a lot of trouble figuring out what to wear as a shirt for my DragonCon costume. I've tried modding several shirts I bought, but for whatever reason they just haven't worked. Finally I decided I would have to make one.
I bought a pattern and found the cloth I wanted. But today when I opened the pattern and looked at it, I realized the shirt I planned to sew was almost identical in style to the one I tried to dye last week, the one that didn't take the dye but did take the brown Sharpie ink (which lasted through a wash, incidentally, so it is permanent). I did something I've never done before: took the shirt apart to use it as a pattern.

Look, here is a picture of me cutting out pieces from fabric that I neglected to iron! I was so positive that this wouldn't work that I just slopped the pieces together all anyhow.
And yet...somehow, it worked. A few months ago I could not have done it. It's safe to say that I've leveled up in sewing, which was one of my goals this year. Before today, I had never made anything with sleeves and had never made anything with gussets. Now I have, and I did a pretty good job (although not perfect, because let's face it, we're talking about me).
The shirt's not done, but it's close and I think it's going to work with my outfit. Here's a picture of me wearing it with my corset to see how it fits before I finish it. The bodice is very dark brown cotton and the sleeves (also not finished) are patterned floaty material that I probably can't wash.

I was using a cord to gather the neckline, but I decided it wasn't working enough and changed it out for a piece of elastic. The elastic works much better. I also extended that little thingy in the middle of the neckline several inches, and will probably add grommets and lace it up. Hopefully that will make the bodice appear more fitted and will reduce the baggy look over my breasts. (I'm also not wearing a very good bra in this picture; I actually bought a bra specifically to wear with this outfit. No one will ever see it, but I assure you it's brown and actually matches the damn outfit, because I am nothing if not obsessive when it comes to colors and patterns.)

Here's the shirt where I left it for tonight. I'll try to finish it within a day or two. I also want to add another layer, possibly two, of material to the sleeves to give it a more fluttery look, and I may add feathers somewhere if I can figure out where and how. I'm taking suggestions, incidentally.
Holy crap, I only have one more weekend before DragonCon--and next Saturday I have to get my car worked on and my hair cut. I'm running out of time!
Friday, August 9, 2013
Throwing down th--no, gluing feathers on the gauntlet
Look at me, updating on a Friday! Only three weeks left until DragonCon.
In a "thank goodness I finally came up with a plausible reason to dress like a steampunk owl" moment of brilliance, I've changed the focus of my costume slightly. Instead of an actual owl, my costume is that of an owl catcher. Because to run a time machine, you need a live, unharmed owl, of course. And I'm the one to supply it.
What does an owl catcher need? A gauntlet! Because owls nip and pinch. I didn't want a regular falconry gauntlet, mostly because they're big and heavy and therefore hot, partly because I would just look silly without an actual owl to carry on it. But I found this tutorial to make a leather bracer, and that seemed like a good starting place.
I don't have any really thick leather. The thickest I have is a scrap too small to do much with, so I went with a thinner, more supple piece that was big enough. I pretty much followed the tutorial so I won't repeat it except to say that it's a lot different with thin leather. I could not get the stupid edges to bevel no matter what I did with the spoon, mostly. They look okay anyway, though. At least, I'm okay with them. I have low standards.

For lacing, I decided to use a length of the laces that came with my corset. The corset I ordered turned out to be too generously sized for me (yay dieting! yay doing situps and hiking all the time!) and I cinched the laces in, knotted them, and cut the excess off. So I have two lengths of tough black laces. I used my leather punch to make the holes, then got worried that the thin leather would tear with all the adjusting of laces I'd have to do. So I decided to add grommets, of which I have an awful lot.
I'd never used grommets before. I just watched the first online video tutorial I found, but it was easy. Basically, you push the bigger piece of the grommet through front to back, set it on a firm surface that you don't mind if it gets dented a bit, put the other half of the grommet over it on the inside, put the pointy end of your grommet tool thingy on top of that, and hammer that metherfeckin thing hard with a hammer. Trust me, it works. It's also kind of fun.

After lacing the gauntlet, I decided it needed some extra decoration. I'd never tried embossing leather and it turns out that I didn't press hard enough. Once it dried, most of the drawings I'd made were almost invisible. But that's okay, because I have Sharpie markers.

Above: I let the gauntlet dry overnight while sitting up like this.
Before I put the feather trim on this evening, I wanted to make it look like the gauntlet had seen some use. Since I don't have an owl, and since an owl would probably slice its way through the leather without even noticing it, I turned to the one sharp-clawed creature I do have access to: Jekyll. You know, my cat who bites me all the time.
He didn't want to bite me today. Or scratch me. He just wanted to be petted no matter how much I tried to awaken his hunting instinct by teasing him with the laces or with one of his 10,000 cat toys scattered throughout the house. This is the cat who woke me at 3:30 a.m. last night after trying to climb into the (capped) chimney, and when I picked him up--groggily afraid a rabid raccoon had found its way into the chimney and was after him--he almost casually bit and scratched my arm. This is the cat who lies in wait for me to walk by in the mornings when I'm trying to get ready for work, and leaps out at my ankles and seizes the hem of my nightgown or the cuff of my pants. This is the cat who lies under my computer table while I'm online, purring and occasionally nipping at my bare toes.

Anyway, finally I managed to get him excited enough to tear into my gauntlet. Authentic battle damage! I decided that was enough for now, and took the gauntlet off to finish it.
I had bought a feather boa to use as trim, so I measured a piece off and cut it. I then trimmed the feathers short on one side of the piece, laid down a line of glue (my favorite Gem-Tak) and pressed it into the inside of the leather cuff.
Then I was too impatient to let it dry before I took pictures. Hopefully it will stick to the rough side of the leather. But for now it looks good. Here's a clever photo I took to show both sides at once. The fist of justice! Note that I put on my awesome hat even though I knew it probably wouldn't show in the picture, because I wanted to get in character a bit.

And finally, here's a hopefully readable close-up (backwards--you know, I could have taken it off to take a picture, huh?) of the embossed-and-Sharpied design. SOC stands for Society of Owl Catchers. (If SOC stands for anything else, especially if it's something nasty, please don't tell me.) And that's not the best owl ever drawn, even by me, but it's at least recognizable. Don't think of it as a bad drawing, think of it as an original American Primitive.

Sunday, August 4, 2013
Dying, sewing, and sticking feathers on things with glue
Today's post was going to be all about the transformation of a bright coral cotton blouse into an elegant black top that I may wear as part of my DragonCon costume. But I couldn't find the right size buttons and had to order some online today, so until I get them and sew them on I can't claim I'm done with the top. I also can't make the decision as to whether I'll wear it or not. I like it, but I'm not sure I like it enough.
I didn't just dye that shirt, though, I also dyed a light jacket thingie that I stopped wearing because the khaki-green color just doesn't look good on me, and a pair of long white socks that I got on sale but never wear.

The coral shirt is 100% cotton, the jacket is 60% cotton and 40% modal, and I don't know what the socks are made of. Cotton dyes beautifully, so I got a bottle of black RIT dye and used the stovetop method to dye the clothes.

I'd used RIT dye before, but only for undyed wool (one of my hobbies is handspinning). I didn't think about bleaching the clothes first, just dumped them in the dyebath. I also probably didn't keep the water hot enough. When I took the clothes out of the dyebath they looked fine, but after drying overnight they were really uneven. The decorative stitching around the blouse's neckline didn't dye at all, but I like the effect.

I redyed the blouse by itself the next night, with much better results. After I took it out of the dyebath I added the jacket; it didn't dye as evenly but I like the shade of gray a lot better than the green it was before. (The socks hardly dyed at all, so I guess they aren't made of natural fibers.) I washed the clothes in the washer, delicate setting, and they look quite nice.

Anyway, so that was one thing I did this week. On Friday morning, I woke up with a bad crick in my neck, so after work I spent the rest of the day lying on the bed with a heating pad on my neck, movies on the TV, and bleak misery in my heart. To occupy myself I picked up the sleeve pieces of the nightgown I'd started sewing way back in April, and finally did the embroidery I'd planned to do but never quite found time for.
Saturday my neck felt a bit better and I finished the embroidery. Today I intended to finish the nightgown, but, well, see this picture? If you can tear your attention away from my adorable cat, you can see what I accidentally did when I sewed on one of the sleeves. Yeah. I need to rip that seam out and fix that. Maybe next April.

Finally, I ordered a very nice fan for DragonCon--it's hot, I'll be wearing several layers of clothes including feathers, and I'll be doing a lot of walking. I need a fan. I like this one, but it was a bit drab. To dress it up a bit, I decorated the tassel on its end. Ordinarily I'm not a fan of gears stuck randomly to things (hey, gears! that makes it steampunk, right?), but I think this one looks kind of neat. I also added some turkey feathers and I like them well enough that I plan to glue them in place as soon as I can find where I put the glue.

Sunday, July 21, 2013
New petticoat started
I got an email that my corset has shipped, so by next weekend I should be all set to work on the main parts of my DragonCon costume. In the meantime, I've started the petticoat.
Unlike the practice petticoat I made a few weeks ago, I'm being careful with this one. I'm using the feather print fabric that I love, too. Yesterday I spent an hour cutting out the pieces for the bottom two tiers. At one point I had a measuring tape around my neck, a T-square in one hand, and a yardstick in the other. I used all three tools, too, to make sure the pieces are the right size and shape. Not that this is a complicated pattern at all, especially since I'm not even thinking about the waist tier yet.
Because the corset--assuming I ordered the right size and can get it on (and alternately, that I ordered the right size and it's not too big)--will make my waist and hip measurements a bit smaller than they actually are, I'm going to wait and do the waist tier after I have the corset. I also realized I won't want a lot of bunchy layers under the corset even if they won't show. So instead of using elastic, I'll be making an actual waistband, probably with a button closure. Same for the bloomers that I plan to remake soon. Same for the skirt.
At the moment, I'm sewing a feather trim to the bottom hem of the petticoat. This is six yards around, remember, which will make for lots of lovely ruffles. I tried to sew it with my machine but it didn't like the thickness of the trim's tape or the stickiness inside it (the feathers are glued into the tape, a very sticky glue that gets on the needle), or the feathers' shafts either. So I'm having to hand-sew it. Six yards is eighteen feet, you know, and it's a slow process. Fortunately I have the entire box set of Gundam Wing that I haven't rewatched in a while.
Once the feather trim is complete, I'll go back and hand-sew a lace band on top of the hem, to hide the raw edge and make the whole thing look a bit more finished. I won't be to that point for a while, but here's a picture of what it will look like. If I do it right.

Sunday, July 7, 2013
No update this week
Yeah, I got nothin'. Even with a four-day weekend, I didn't do anything. Well, I started one project but didn't get far (making moth hat/hair decorations; it's not working as well as I'd hoped) and I ordered some stuff to finish my goggles. Did you know there's a website called The Buckle Guy? I ordered some buckles and other stuff from the Buckle Guy, since it didn't seem worth it to just order, like, one buckle for my goggles and that was it. I also ordered the new Dragon*Con steampunk lanyard, because I always forget to bring a lanyard and end up having to buy one when I finally get to the dealer's room. The trick will be to not forget to bring my steampunk lanyard.
Oh wait, I did do one thing. It took about thirty seconds, but here's a picture.

It's a tiny copper owl charm I found on etsy, which I strung on some copper-ish links and pinned to my hatband. I'm going to try to find some more charms to put with it. Here's another picture of the hat, along with my owl goggles and a cheap pocket watch that I found half-price ($5! and so far the watch hasn't broken!) and bought because there's an owl on it.
 So in other words, I have my accessories set. I should have my faux-leather corset any day now too, and the shoes will work as they are if necessary. All I need is the rest of my freaking costume.
Oh wait, I did do one thing. It took about thirty seconds, but here's a picture.

It's a tiny copper owl charm I found on etsy, which I strung on some copper-ish links and pinned to my hatband. I'm going to try to find some more charms to put with it. Here's another picture of the hat, along with my owl goggles and a cheap pocket watch that I found half-price ($5! and so far the watch hasn't broken!) and bought because there's an owl on it.

Sunday, June 30, 2013
How to Darken Brown Shoes that aren't made of leather
I searched and searched the internet trying to find advice on how to darken brown leather shoes but could only find advice for leather shoes. These shoes are not leather. Since I have a solution, here it is, internet.
First of all, I bought these shoes for my DragonCon steampunk owl outfit. They were on sale and I like them, but they were more tan than brown and I wanted them darker. So I removed the laces and got a tin of brown Kiwi shoe polish.

I didn't use any kind of fancy shoe cloth, just a paper towel. It worked just fine. I spread a layer on the "leather" parts of the shoe (I think they're polyester) and was pleased that it acted just like leather. The polish soaked into the grain and darkened immediately.
I did two coats, then did the other shoe. The lighting in this picture isn't great, but hopefully you can see the difference in the darker rear shoe and the lighter fore shoe that I hadn't yet worked on. They darkened a bit more overnight too, I guess as the polish soaked in more.

The next day I took a clean paper towel and buffed the shoes. I was worried the polish would come right off again, but it didn't. It just buffed to a nice shine. I replaced the laces with darker brown and threaded a fake key on one to see how I like it (I don't; I'll probably replace it with something else eventually). I was going to glue something to the shoes themselves to make them more steampunk, but so far I haven't found anything that I like well enough. But I think they look good as they are.

They're going to kill my feet, but I'll look stylish.
Sunday, June 16, 2013
Owl Goggles
I hadn't planned to add so many feathers. I'm still not completely happy with them, and of course I still need to make a strap. And they won't sit on the brim of my awesome hat so I'll have to figure out some other way to display them that doesn't involve wearing them. But here they are, my very first pair of goggles, and a pair of the original welding goggles they started life as:

For those of you who are interested in making your own, it's a lot easier than I thought it would be. My first step was to remove the original strap, the plastic piece over the chain connecting the eyepieces, and remove the lenses (the eyepieces unscrew so you can remove them easily). Then I spraypainted them copper, making sure to get all the surfaces including the chain, and let them dry overnight.

Once they were dry, I put the lenses back in and adjusted the chain so that the goggles fit me. You can move the chain while the eyepieces are unscrewed; trim off excess so the ends won't gouge you in the eyeball. That would be pretty ironic if your eye protection blinded you. I noticed that there were two round pieces on the sides of the goggles, attached with a plastic pin through a hole. I have no idea what these are for, but I removed them and set them aside.
At this point I wasn't sure what to do. I had planned on painting decorations on the sides and then gluing some feathers on, and then I figured I'd be done. But they looked kind of boring, and I have all this leather scrap. I idly picked up a piece of pliable brown leather and wrapped it around the edge of an eyepiece.
It looked amazing! So I got out the glue, Gem-Tac, and put a line of it along the straight edge of the leather (on the wrong side, of course). I separated the eyepieces (took the chain off) so I could handle them more easily. Then I wrapped the leather around the edge of the eyepiece, leaving a small gap for the chain, tugging and stretching the leather to make it fit snugly over the plastic.

Gem-Tac turned out to be perfect for this kind of project. It starts to dry quickly so it held the leather in place as I worked, but it doesn't dry crazy fast like epoxy or superglue, so I could make adjustments after a few minutes if the leather wasn't quite where I wanted it.

Then I wrapped the leather around to the inside of the eyepiece. I didn't try to cover the inside completely and I did a messy job, but keep in mind that at this point I still didn't think the leather was going to actually work at all. I trimmed and cut notches as necessary to make it snug.

When I finished, I was blown away by how good it looked.

I put the chain back in place before the glue had completely set--I was worried I might have glued the lenses to the eyepieces and wouldn't be able to open them later. I also cut a piece of leather and glued it in place around the chain. Then I noticed the plastic pieces I'd removed earlier. I used my awl to poke holes in the leather so I could put the pieces back.

Then I took a break and ran to the store, and while I was gone I picked up some little brass acorn nuts at Lowe's. I was going to buy two dozen, since each eyepiece has a dozen spaces, but they're too damn expensive--almost $2.50 for four. I bought one dozen instead (if I were going to make a lot of goggles, I'd buy the acorn nuts in bulk, maybe from here). When I got them home, though, they looked awfully shiny. I set them out on a piece of cardboard and gave them one quick spritz of copper spraypaint--I didn't try to cover them completely, I just wanted to dim the shininess a bit. I let it dry overnight, then in the morning glued them on along with some other deco.

Next I considered what to do about a headstrap. Saturday I'd made the rounds of thrift shops and got two black leather purses (one for 99 cents and the other, a Liz Claiborne bag, for $1.50. Damn!), but both had straps that were a tad too wide. Plus the black leather looked funny next to the brown leather and copper/brass. So I decided to make a strap from leather scraps, but I wanted it to be a bit wider than the original strap. To solve the problem of getting a wider strap through the premade plastic gaps, I decided to attach loops with D-rings, to which I could attach a wider strap. As it happens, I had two D-rings of the right size that came off one of the purses, so I cut two pieces of thicker leather--in fact, I used the thickest, sturdiest leather I had, the same kind I used last week for my lawnmower handlebar grips.

Getting the straps through the little holes, which I had covered with leather and glue, was not easy. I used an X-acto knife to open up the gaps, then cut each leather strap at an angle. I used the awl to help cram the tip of the angle-cut end through the gap. As soon as I could grip it on the other side with needle-nosed pliers, I was able to pull it through. Then I trimmed the end straight, put the D-ring on, and glued it. For extra strength I also put a few stitches through the leather. I did a piss-poor job of it since I couldn't get the awl to go through all three thicknesses at the correct angle, and ended up using the needle-nosed pliers to force the needle through. KIDS, DON'T EVER DO THIS. It's dangerous! Not only are needles not meant for that sort of pressure and could break, sending a very sharp piece of metal into your eyeball (see irony, above), it's really easy to stab yourself in the finger like I did.
(Incidentally, a good thing to trim leather with is a wire cutter. Works better than scissors.)

Anyway, I got it finished and decided to wait on the strap itself until I can order some things I can't get locally. I almost declared myself finished. Then I remembered I'm going to DragonCon dressed inexplicably like a steampunk owl, which meant I had to add feathers. I probably should have just left well alone, I don't know. I could have created a lady naturalist persona and been perfectly happy, but noooo, I had to stick feathers on everything.
As I said earlier, I never intended to add many. I used pheasant feathers, which looked most owl-like of all the feathers I'd bought (I also have guinea hen, chicken, and turkey feathers). I chose three for each eyepiece, hampered a bit by the light but pleasant breeze blowing through the garage from the open doors. Then I held my breath, because I was about to do something irreversible. I put a triangle of glue on the edge of the first lens, thereby permanently gluing them closed. Then I pressed the feathers in place, arranged them carefully so they'd make a bird-of-prey frown, and held them there until the glue dried enough that I could let go. Then I did the same to the other lens.

And then I realized I'd RUINED MY GOGGLES, because I overlooked the fact that the eyepieces were sitting on a flat surface and not at the same angle they'd be when worn. You know that little scene in WALL*E when Wall-E wakes up and comes back to himself, and he adjusts his eyes until they're at just the right angle? Well, when I held my goggles up to my face, the angle of the feathers changed from fierce bird-of-prey frown to an anxious Wall-E expression.
I had to add more feathers. Then the goggles looked unbalanced, so I had to add a few feathers at the bottom too. They're more feathery than I wanted, but they also have a definitely owlish look, so maybe I'll get used to them.

I realized something while I was working, though. Back in April when I started this steampunk-my-garage project, all I really wanted was a space where I could work on crafts without making a mess in the house or running out of room. Well, I succeeded. Maybe the garage isn't as steampunky as I'd like--I can't afford to do more with it at this point--but I've got an awesome workspace.

Subscribe to:
Posts (Atom)